by
BeetleCraft
This tutorial is written for
Paint Shop Pro 8.
Want to wait and do the tutorial later? Then download one of the following:
Click here for Incredimail file format.
Click here for Word .Doc format.
SUPPLIES:
Any image should work.
Plugins needed:
Simple
Eye Candy 4000
Ulead Effects - Particle filter
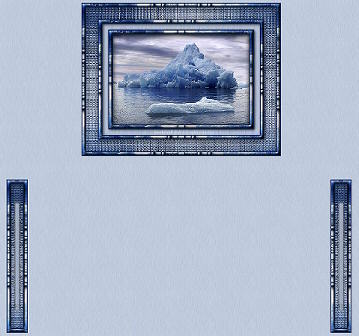
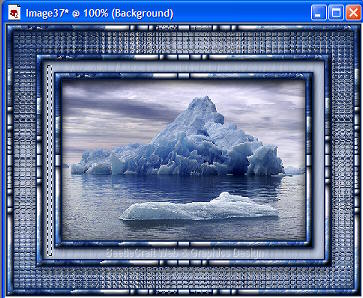
FRAME:
1. Open Image and resize to no larger than 300 in height.
Shift/D twice - close out original image & setting aside one copy.
2. Select a light color and a dark color from your image.
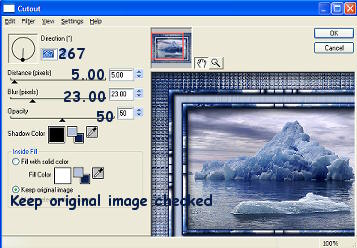
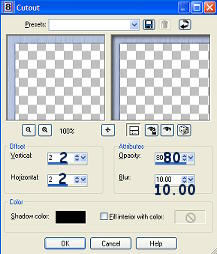
3. Effects/Plugins/Eye Candy 4000/Cutout using the following settings.
 4.
4. Image/Add Borders - 2 Symmetric using dark color from image
5. Image/Add Borders - 7 Symmetric using light color from image.
6. Selections/Select All - Selections/Contract by 7. Selections/Invert
7. Effects/Simple/Half Wrap
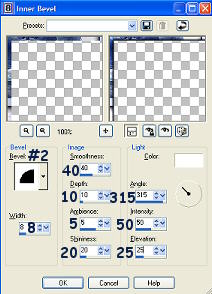
8. Effects/3D Effects/Inner Bevel using the settings below.
 9.
9. Selections/Select None
10. Image/Add Borders - 2 Symmetric using dark color from image
11. Image/Add Borders - 14 Symmetric using light color from image.
12. Selections/Select All - Selections/Modify/Contract by 14 - Selections/Invert.
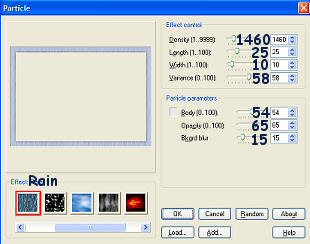
13. Effects/Plugins/Ulead Effects/Particle using the settings below.
 14.
14. Effects/3D Effects/Cutout using the settings below.
 15.
15. Selections/Select None. Image/Add Borders - 2 Symmetric using dark color from image
16. Image/Add Borders - 7 Symmetric using light color from image.
17. Selections/Select All - Selections/Modify/Contract by 7 - Selections/Invert.
18. Effects/Plugins/Simple/Half Wrap
19. Effects/3D Effects/Inner Bevel using same settings as #7 above. Selections/Select None
20. Image/Add borders - 2 - symmetric checked - dark color
21. Image/Add Borders - 28 Symmetric using light color from image.
22. Selections/Select All
23. Selections/Modify/Contract by 28
24. Selections/Invert
25. Effects/Simple/Half Wrap
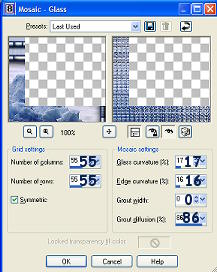
26. Effects/Texture Effects/Mosiac-Glass using the settings below.
 27.
27. Effects/Plugins/Eye Candy 4000/Cutout using same settings as #3 above.
28. Selections/Select None
29. Image/Add Borders - 2 Symmetric using dark color from image
30. Image/Add Borders - 7 Symmetric using light color from image.
31. Selections/Select All - Selections/Modify/Contract by 7 - Selections/Invert.
32. Effects/Plugins/Simple/Half Wrap
33. Effects/3D Effects/Inner Bevel using same settings as #7 above.
34. Selections/Select None
35. Image/Add borders - 2 - symmetric checked - dark color
36. Add watermark and save as .jpg. Set Aside.
BACKGROUND:
 1.
1. New image - Transparent - 100 x 100
2. Flood fill with the light blue color.
3. Effects/Plugins/Ulead Effects/Particle using the same settings as #13 for the frame.
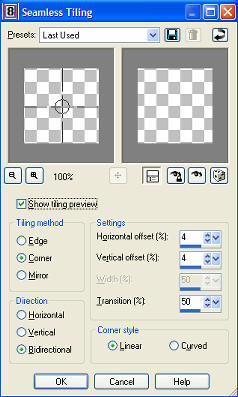
4. Effects/Image Effects/Seamless Tiling using the settings below.
 5.
5. Save as .jpg
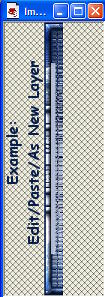
SIDEBAR:
1. Selection Tool/Rectangle and select from the top left corner over to right for about 25 pixels.
This should select it in the middle of the mosiac glass filter you applied. See example below.
 2.
2. Edit/Copy -Selections/Select None - Edit/Paste/Paste As New Image.
3. Now go back to your frame image and we are going to take a second selection
this time from the blue area where you applied the particle rain filter too.
Select about 5-6 pixels. See example below.
 4.
4. Edit/Copy. Selections/Select None.
5. Now go back to the bar image you had just pasted from the first selection.
Edit/Paste As New Layer. This will put the blue selection into the center of the image.
You now need to move it over to the edge towards the right. Use the Mover tool to do this
but do it slowly so you keep the selection center vertically. See examples.
 6.
6. Make sure raster 2 layer is the active layer then do Selections/Select All - Selections/Float.
This should put marching ants around the light blue area.
7. Effects/3D Effects/Cutout and apply the settings below.
 8.
8. Selections/Select None
9. Layers/Merge/Merge Visible
10. Image/Canvas Size - double the width but keep the same height but
make sure you hit the arrow toggle pointing to the left. See example below.
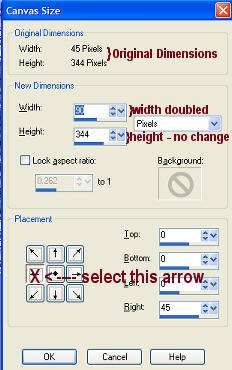 11.
11. Layers/Duplicate
12. Image/Mirror
13. Layers/Merge/Merge all flatten
14. Image/Resize : 75% Bicubic - all layers checked
15. Save as .jpg
Put together in Incredimail's Letter Creator or any other stationary program you use.
Tutorial Written by
KaEfEr of:

To be notified whenever we update our site, please join our
UPDATES list.
