by
BeetleCraft


This tutorial is written for
Paint Shop Pro 8 or 9 & PSP Animation Shop 3.
Want to wait and do the tutorial later? Then download one of the following:
Click here for Incredimail file format.
Click here for Word .Doc format.
SUPPLIES:
Tube of your choice.
Font of your choice.
Gradient of your choice.
Alpha PSPimage
1. Image/New size 125x125, transparent. (we will be cropping it in a bit)
2. Select a font that's a bit wide so you'll be able to see the gradient animation well.
3. Select a tube that you think will go well with your font.
4. Load your gradient in the background stylebox. (make sure the gradient's angle is set to 0.)
In the foreground stylebox, pick a dark color from your tube.
5. Now we are going to prepare our image for the alpha.
First click on your tube, Edit/Copy now back to your new image - Edit/Paste.
At this time, you should resize your tube if it's too big.
Just make sure you uncheck resize all layers option.
6. Let's save. File/Save As and choose .pspimage. Click on options and make sure it's set to PSP8 for this save. (the reason why we do this is so it saves the vector layers you'll be applying.)
7. Now it's time to do the letters. Text/Vector with the below settings.

(The size would depend on the font you use and the tube. You want them both to look like they belong together.)
8. On your new image, make sure the tube layer is selected. Then click on the image and the text box will open. Let's begin with the letter A and click ok. You will see a vector box around the A. Also your gradient will be with 0% angle and you will see a 2 pixel outline of the dark color you chose. If you think you have too much excess space around your alpha, now would be the time to crop your image.
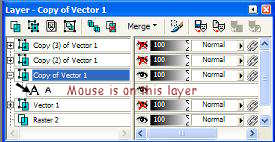
9. Now we are going to prepare the other layers for the animation to work. Click on the vector layer and hit duplicate 3 times. You should now have 4 vector layers, the tube layer and the bottom layer.
10. Click the visibility tab (the eye) on the layer palette so there's red X on the two top vector layers and the first vector layer. Click on the 2nd vector layer. We will be changing the gradient angle at this point.
11. When you click on the vector layer, open the tree so you see the letter A sub-layer. Point you mouse to that layer. See arrow on example:
 12.
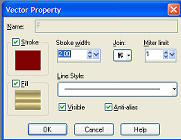
12. Right mouse click and select Properties. A box will pop up and you'll see your gradient and color as well as other things. See example:
 13.
13. Click on the gradient and a material box will open showing the settings for the gradient. See example:
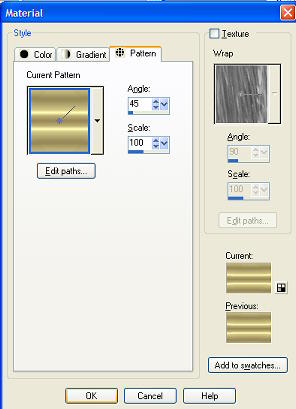 14.
14. The only thing you'll be changing here is the Angle to 45. Click ok.
15. Now do the steps 10-14 on the other two vector layers. Making sure you change the visibility tab as you do. Two exceptions though: For vector layer 3, change the angle to 90 and for vector layer 4, change the angle to 135. After doing this, we won't have to change the gradients again. Save. Always hit the save button so you won't lose anything you done as we'll be needing this image for the whole alphabet. In fact, you can save this and use it over and over for different Alphas you may want to make..
16. Now it's time to save each vector layer as a .psp file so we can use it later for the animation. Let's begin with vector layer 1. Turn off the visibility to all other layers except the tube layer and the vector layer.
17. Layers/Merge/Merge Visible
18. File/Save copy as and select .psp. Erase the image part if you automatically see .pspimage. (Make sure you click on the option tab and change it to PSP7 or else it won't open in Animation Shop.) Save this one as Avector1.psp. Edit/Undo.
19. Repeat steps 16-18 for the other 3 layers saving each one the same only change the number to correspond with the vector layer.
20. Letter A is now complete and ready to animate later. Now we'll learn how to change the text for the other letters of the alphabet.
21. Turn off the visibility on all layers except vector layer 1. Even turn off the tube cause we are going to be making the small alpha letter. (You usually don't want to use a tube on the smaller letters because then the alpha may be too busy. It just depends on your taste)
22. Now we'll do the small a. Click on vector layer 1. Right mouse click and select Edit Text option. The text box will open up. See example:
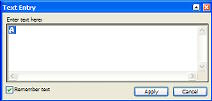
Change the A to a and hit Apply. You now have the small letter ready. Repeat this step for each vector layer.
24. Repeat steps 16-19.
25. Repeat step 21-24 for every letter, symbol you want to include in the alpha. When finished, it'll be time to animate.
ALPHA ANIMATION:
1. Open animation shop
2. File/Open and scroll to the folder you have your .psp files in that you saved above.
3. Click on vector 4.psp for letter A. It'll load as a new animation but there won't be anything animated at this point. (the reason why I am having you open #4 first is so that the animation works correctly when we add the other 3 .psp files)
4. Now right mouse click on the new animation and scroll to Insert Frames/From File.
5. Open the folder for the alpha again. This time hightlight vector3.psp, then vector2.psp and finally vector1.psp. You should have all 4 of them in the little box. See example:
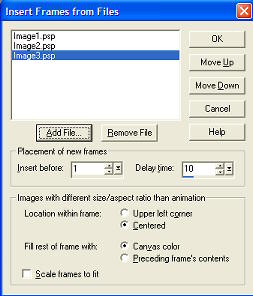 6.
6. Leave all settings at default and click OK.
7. Now your new animation has a total of 4 frames loaded. Click View/Animation and your letter is now animated. If you like it as is, click File/Save and name is ALPHANAME_A.gif.
8. Repeat the above for all letters and then you have a completed alpha.
9. Note: If you don't like the speed and want to slow or speed the animation up do the following:
Edit/Select All and it'll select all of your frames.
Now right mouse click on your animation frames and go to Frame Properties. The following box will open:
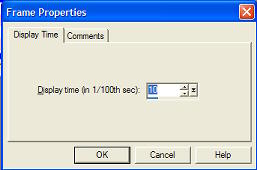 10.
10. Change the Display time higher for slower animation or lower for faster animation.
I think now we have everything done. Now it's time to share your alpha. I hope you understand and enjoy this tutorial as much as I enjoyed writing it.
*hugs*
KaEfEr
Tutorial Written by
KaEfEr of:

To be notified whenever we update our site, please join our
UPDATES list.
