by
BeetleCraft
This tutorial is written for
Paint Shop Pro 8.
Want to wait and do the tutorial later? Then download one of the following:
Click here for Incredimail file format.
Click here for Word .Doc format.
SUPPLIES:
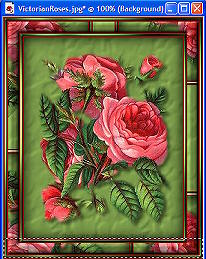
Any floral tube should work.
Plugins needed:
Simple
Greg's Factory Output Vol. II
FRAME:
1. Resize tube to no larger than 380 on longest side. Shift/D and set copy aside.
2. Select a light color and a dark color from your tube.
3. Layers/New Raster Layer
4. Flood fill with light color
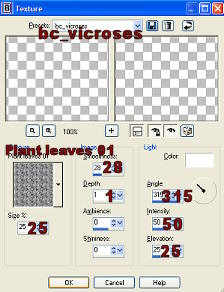
5. Effects/Texture - use the settings you see below.
 6.
6. Layers/Arrange/Send to Bottom.
7. Click on tube layer which should now be the top layer -
Selections/Select All - Selections/Float and it should put marching ants around the tube.
8. Selections/Modify/Contract by 5
9. Selections/Modify/Feather by 5
10. Selections/Invert and then hit the delete key
(you may have to adjust the contract and feather depending on the tube.)
11. Selections/Invert
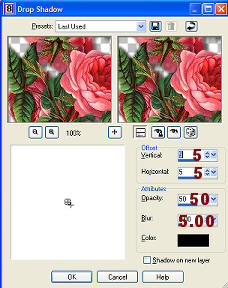
12. Effects/3D Effects/Drop Shadow using settings below.
 13.
13. Merge/Merge All Flatten
14. Selections/Select All
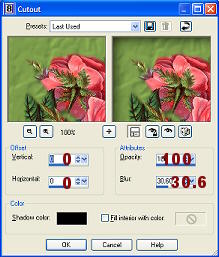
15. Effects/3D Effects/CutOut using the settings below.
 16.
16. Image/Add borders - 2 - symmetric checked - dark color
17. Image/Add borders - 4 - symmetric checked - light color
18. Selections/Select All - Selections/Modify/Contract 4 - Selections/Invert
19. Effects/Plugins/Greg's Factory Output Vol. II/Pool Shadow/default settings
20. Effects/3D Effects/Inner Bevel using the settings below.
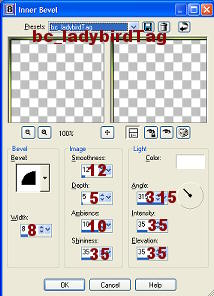 21.
21. Image/Add borders - 2 - symmetric checked - dark color
22. Image/Add borders - 20 - symmetric checked - light color
23. Selections/Select All - Selections/Modify/Contract 20 - Selections/Invert
24. Effects/Plugins/Simple/Blintz
25. Effects/Texture - (same as step #5)
26. Effects/3D Effects/Inner Bevel - (same settings as step #20)
27. Image/Add borders - 2 - symmetric checked - dark color
28. Image/Add borders - 4 - symmetric checked - light color
29. Selections/Select All - Selections/Modify/Contract 4 - Selections/Invert
30. Effects/Plugins/Greg's Factory Output Vol. II/Pool Shadow/default settings
31. Effects/3D Effects/Inner Bevel - same settings as step #20
32. Image/Add borders - 2 - symmetric checked - dark color
33. Add watermark if you want then save as .jpg.
34. Image/Image Information and make note of the height of this framed image - see example below.
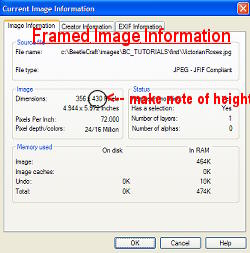 35.
35. Set aside.
BACKGROUND:
 1.
1. New Image - transparent - 150 x 150
2. Selections/Select All
3. Go to the copy of the tube you have setting aside. Edit/Copy
4. Back to your new transparent image and Edit/Paste/Paste Into Selection - Selections/Select none.
5. Effects/Plugins/Simple/Pizza Slice Mirror
6. Layers/New Raster Layer and flood fill with your light color
7. Lower opacity to about 80
8. Layers/Merge/All Flatten
9. Effects/Texture - use the settings below.
10. Save as .jpg
FLOWER ICON:
1. New image - transparent - 25 x 25
2. Selections/Select All
3. Go again to the tube you have setting aside, Edit/Copy
4. Back to your new image and Edit/Paste/Paste Into Selection - Selections/Select None.
5. Effects/Plugins/Simple/Pizza Slice Mirror
6. Effects/3D Effects/Inner Bevel
7. Save as transparent .gif - Set aside
SIDEBAR: Part A
1. Selections Tool/Rectangle -
Select bottom of framed image from left side to right side and up till the first set of borders meets the image.
See example below.
 2.
2. Edit/Copy - Edit/Paste/Paste As New Image.
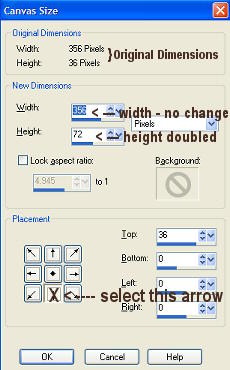
3. Image/Canvas Size - keep the same width but double the height .. make sure you hit the
down arrow toggle. See example below.
 4.
4. Layers/Duplicate
5. Image/Flip
6. Layers/Merge/Merge All Fatten
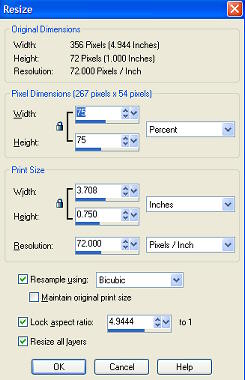
7. Resize : 75% Bicubic - all layers unchecked - do this twice - See example below.
 8.
8. Edit/Copy
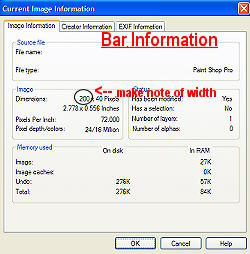
9. Image/Image Information and make note of the width of this bar - see example below.
 10.
10. Set aside.
SIDEBAR: Part B
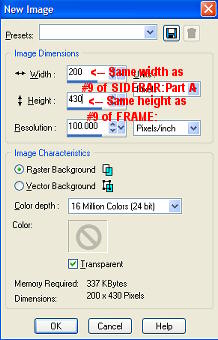
1. New image - transparent - make the width the same as the bar width you noted (see #9 of SIDEBAR:Part B)
and make the height the same as the framed image height you noted. (see #34 of FRAME: above.)
See example below.
 2.
2. Edit/Paste/Paste As New Layer - 2 times
(this should paste your sidebar you just made two different layers) or you can Ctrl+L two times.
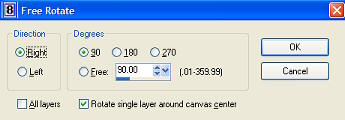
3. Highlight layer #3 -
Image/Rotate/Free Rotate - check right - 90 degrees .. all layers unchecked .. Rotate single layer around canvas center checked.
See example below.
 4.
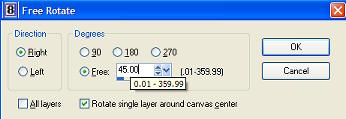
4. Edit/Paste/Paste As New Layer - this should paste your bar again on a new layer.
5. Image/Rotate/Free Rotate - check right - 45 degrees .. all layers unchecked .. Rotate single layer around canvas center checked.
See example below.
 6.
6. Layers/Duplicate - Image/Mirror
7. Go to your icon image you created - Edit/Copy -
back to the bar you're working on
8. Edit/Paste/Paste As New Layer - it puts the icon directly in the center - See example.
 9.
9. Layers/Duplicate - this will make a second icon layer directly on top of the first icon.
Copy of Raster 5 should be the top layer.
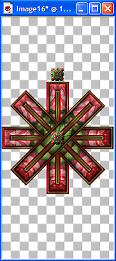
10. Select the move tool - take the top icon and move it to the top of the verticle bar,
with just a slight bit of space between showing. See example.
 11.
11. Layers/Duplicate - Image/Flip -
this will add another icon layer and will flip it to the bottom of the verticle bar. See example.
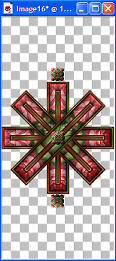 12.
12. Layers/Duplicate (Copy (3) of Raster 5 should be the top layer) -
Select the Move tool and move icon so the corner of it is almost touching the diagonal icon to the
left of the bottom one. See example.
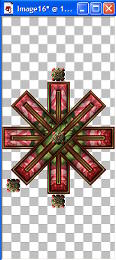 13.
13. Layers/Duplicate -Image/Flip
14. Layers/Duplicate - Image/Mirror
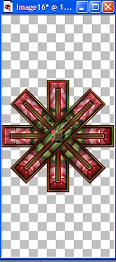
15. Layers/Duplicate - Image/Flip - your bar should now look like example below.
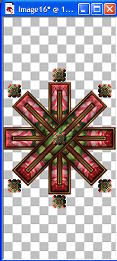 16.
16. Layers/Merge/Merge Visible
17. Save As transparent .gif
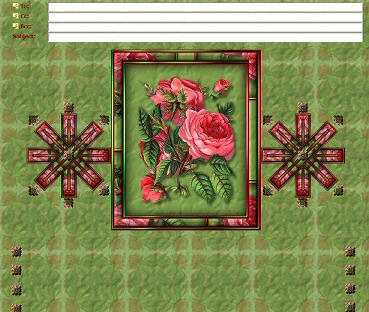
Put together in Incredimail's Letter Creator or any other stationary program you use.
Tutorial Written by
KaEfEr (remove the 2 from addy) of:

To be notified whenever we update our site, please join our
UPDATES list.
