by
BeetleCraft

This tutorial is written for
Paint Shop Pro 8.
Want to wait and do the tutorial later? Then download one of the following:
Click here for Incredimail file format.
Click here for Word .Doc format.
SUPPLIES:
An image that has a bright colour that stands out. Like my image has the pink flowers.
Plugins needed:
Simple Filters:
(Half Wrap, 4 Way Average, Diamond effects.)
VM Toolbox:
(Zoom Blur effect)
Mura's Filter Meister:
(Prospective Tiling effect)
PREPARATIONS:
1. Select a dark colour from the part that stands out in your image. Select a light colour that compliments your dark colour.
2. Now we need to change our background colour box to gradient. Foreground-Background, Angle 45, Repeats 6
See example:
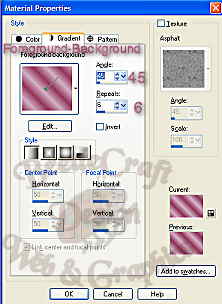 3.
3. Make sure your image is no larger than 300 pixels on the longest side. Duplicate image. Close original.
FRAME:
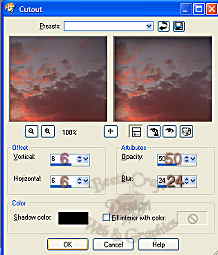
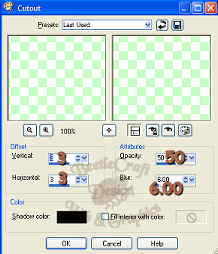
1. Selections/Select All on your image. Effects/3D Effects/Cutout with the following settings:
Repeat cutout but change the V & H to -6.
2. Image/Add Borders 3 Symmetric, dark colour.
3. Image/Add Borders 6 Symmetric, light colour.
4. Selections/Select All - Selections/Modify/Contract by 6 - Selections/Invert.
5. Flood Fill

with your gradient.
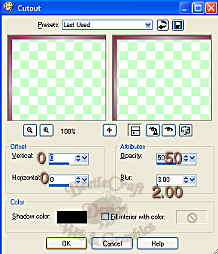
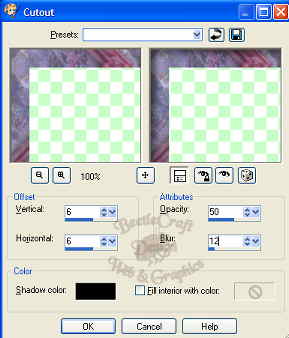
6. Effects/3D Effects/Cutout with the following settings:
 7.
7. Image/Add Borders 3 Symmetric, dark colour.
8. Image/Add Borders 12 Symmetric, light colour.
9. Selections/Select All - Selections/Modify/Contract by 12 - Selections/Invert.
10. Flood Fill
with your gradient.
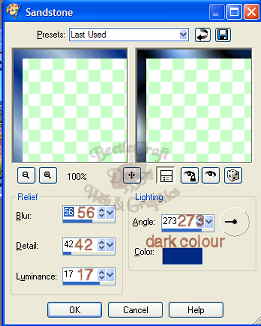
11. Effects/Texture Effects/Sandstone with the following settings:
 12.
12. Effects/VM Toolbox/Zoom Blur with the following settings:
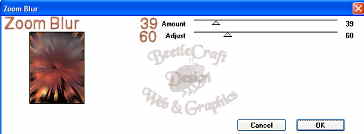 13.
13. Effects/3D Effects/Cutout with the following settings:
 14.
14. Repeat steps 2-7.
15. Image/Add Borders - Symmetric 24, light colour.
16. Selections/Select All
Selections/Modify/Contract by 24
Selections/Invert
17. Effects/Plugins/Simple/Half Wrap.
18. Effects/Plugins/Simple/Diamonds.
19. Effects/Plugins/Simple/4 Way Average.
20. Effects/3D Effects/Cutout with the following settings:
 21.
21. Repeat steps 2-13.
22. Repeat steps 2-7.
23. Selections/Select All
Selections/Modify/Contract by 12
Selections/Invert
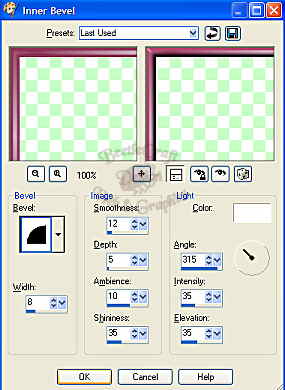
24. Effects/3D Effects/Inner Bevel with the following settings:
 25.
25. You may want to resize now if the image is a bit too large. Resize by 75%.
26. Image/Duplicate - minimize duplicate
27. Add your watermark and save as .jpg. Set aside.
SIDEBAR:
1. With your Selection

Tool and your frame image, select part of the border as you see in the example below:
 2.
2. Edit/Copy
Edit/Paste/Paste As New Image
3. Image/Canvas Size - double the width but keep the same height.. make sure you hit the
arrow toggle pointing to the left. See example below.
 4.
4. Layers/Duplicate
5. Image/Mirror
6. Layers/Merge/Merge Visible
7. Layers/Duplicate
8. Image/Resize : 95% Bicubic - all layers unchecked
9. Repeat #'s 7 & 8 five more times. You should now have a total of 7 layers.
10. Make sure your top layer is active. Selections/Select All
Selections/Float
Selections/Defloat
Selections/Invert.
11. Layers/Merge/Merge Visible. Keep selected.
12. Effects/Plugins/Simple/Half Wrap.
13. Effects/Plugins/Mura's Meister/Prospective Tiling using the following settings:
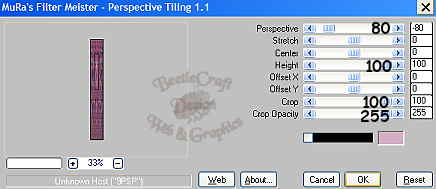 14.
14. Repeat step 13 but change the Prospective to -80.
15. Selections/Select None
16. Save as .jpg
Note: If you'd like smaller sidebars as I have in my example,
just resize your finished one by 75% and then save as .jpg sidebar2 or something like that.
BACKGROUND
 1.
1. Activate your duplicate FRAME that's been sitting aside.
2. Image/Resize bicubic by 75%. Repeat once more.
3. Effects/Plugins/VM Toolbox/ZoomBlur with the same settings as in your frame.
4. Effects/Plugins/Simple/Half Wrap
Effects/Plugins/Simple/Diamonds
Effects/Plugins/Simple/4 Way Average
5. Layers/Add New Raster
Flood
Fill with your light colour.
6. On your layer palette, turn the opacity down to about 60 - 70%. Depending on how you'd like the coloring to be.
7. Layers/Merge/Merge All Flatten.
8. Effects/Image Effects/Seamless Tiling using the settings below:
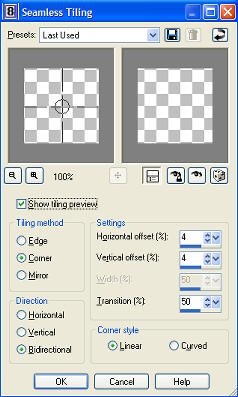 9.
9. Save as .jpg
Put together in Incredimail's Letter Creator or any other stationary program you use.
Tutorial Written by
KaEfEr (remove the 2 from addy) of:

To be notified whenever we update our site, please join our
UPDATES list.
